Last week, we published a blog post that explained WHY real estate agents should already be podcasting. Based on the response we’ve received, it’s clear that most of our readers really do understand the value and need for getting started with podcasting!
One note before we go any further—throughout the remainder of this post, I’ll be guiding you in building your podcast just as you understand it: as an audio channel with audio stories that you can broadcast through iTunes, Stitcher, etc. But I’ll be assuming that you’re also recording these on video, because these make for essential video marketing assets that you can post to YouTube and other social media sites. Ideally, you should be extracting small 1-2 minute highlights and posting these to drive traffic to the full episodes.
And as I stated last week, the goal is not podcast stardom! The goal is having easily-digestible content that you can deliver to your clientele at any given point along their journey with you!
In this post, we’ll get into the nuts and bolts of building your podcast from start to finish. There are 4 parts:
I’ll be going into even finer details on this in an upcoming ebook, “Everything Real Estate Agents Need To Know To Build Podcasting Into Your Marketing Strategy.” Sign up to be notified when the ebook is published!
Part 1) Building your studio
The first step is building out your own little podcast studio.
For many real estate agents, their “studios” are just their cars—and that’s okay! I’ve seen podcasters and vloggers invest a lot of time and money into building a flashy studio, only to deliver boring content. I’ve also seen broadcasters with the worst equipment ever deliver amazing content from the driver’s seat.
My friend Flula here has terrible equipment and shoots videos in his car, and his videos have millions of views:
So if you’re starting out, no need to obsess over a flashy production. Stay focused on good clean media assets that are free of distracting elements and background noise.
Here are three different scenarios to consider when building your podcast:
1) The “Po-boy” broadcast studio: Ready to get going RIGHT NOW? No problem! You might already have the full setup.
- Smartphone: Most smartphones these days let you do the basic stuff—record video, and even trim the front and end of the clip so you don’t have any awkward content that shows you walking over to your position and back to the camera again after your shoot.
- Smartphone Tripod ($20)
2) The “Prosumer” broadcast studio: If you have $230 bucks burning a hole in your pocket (assuming you opt for free editing software), here’s a studio you can build with enough change left over to buy yourself a burrito.
- Digital Camera with audio mic jack: There are many out there. I’m personally a Canon shooter for stills, but I’ve found that Sony really does the best job for video. Your camera can be as simple as a point and shoot with video mode, a handycam, or a DSLR. Just make sure it’s got a mic jack. Here’s a cheap handycam that will work great. ($178)
- A decent lavalier mic: These are super cheap and especially nice if you plan on interviewing other people. ($44)
- Editing software: The software we use is a very user-friendly program called ScreenFlow. In our upcoming ebook, I’ll include a video that will show you how to add background music and graphics to build a nice intro/outro to your video. ($129)
- Burrito: Not mandatory, but strongly recommended… and hey, you’ve got change! Reward yourself! Here in Denver, El Taco de Mexico has the best burrito, despite its sometimes-rough appearance. ($5)
3) The “Bomber” broadcast studio: In our upcoming ebook, I’ll share with you what I call the “bomber studio setup.” It’s a three-camera, pro-lighting, switcher, mixer, solid state recorder set with podcast mic that will have your productions looking and sounding like you’ve hired an entire crew.
The DOs and DON’Ts of building a podcasting “set”
Don’t sweat too much about your set. You may wish you had a gorgeous tropical backdrop or a modern office bearing polished furniture and swanky art—but again, it’s the content you’re delivering that matters. That said, you do want your production to be as clean as possible. Here are some DOs and DON’Ts to keep in mind when setting up your studio.
DO:
- Be mindful of light! Forget about studio lights. The best light comes from a window! If it’s too bright, use the shutters to dim it to the right level. The window can be right in front of you, or slightly to either side of your face. But DEFINITELY NOT behind you or on one side of your face. Backlighting will leave your face looking dark and unidentifiable. Side lighting will confuse the camera, and you’ll either end up with one side of your face looking too dark and/or the other side being blown out. This is not a good look.
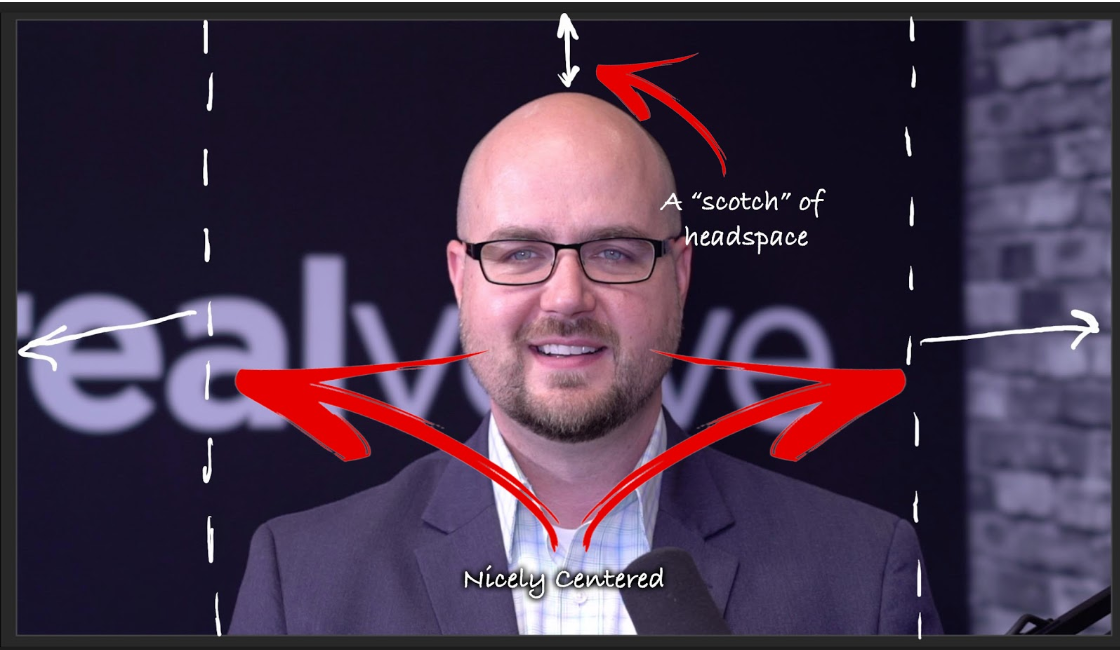
- Consider camera angle and head spacing. In the screenshot below, Realvolve’s very own Dale Warner demonstrates the ideal camera position. Notice the amount of space between the top of his head and the top of the frame. (We actually shaved his head so that you could get a clearer idea. Thanks for taking one for the team, Dale!) Also, notice how he’s nicely framed in the center of the screen, and how the camera angle is just slightly higher than his eyes. (One mistake I see often is a too-high angle. We all know this helps tame the infamous “double chin,” but there’s a line you cross when your viewers feel like they’re hovering above you.)

DON’T:
- Film your content in a personal setting. True story: I once watched a vlog for a local business that was set up in the presenter’s bedroom. Behind her in the room, you could see her dresser; one drawer open and an oddly-shaped garment hanging out—and her very messy bed. I don’t remember what the topic was in this video, but I do remember feeling a little awkward! Stick to locations where you’d feel comfortable having a stranger hang out for a meeting. Living room, office, outside…all great places to record. Take a careful look at your backdrop and identify anything that looks odd. (By the way, the brick in Dale’s background is not really brick.)
- Sit too far away (or too close to) your camera. See Dale’s photo above for proper framing. Not only does it look awkward to have too much random space, or not enough space, audio requires that you’re close enough to pick up clearly.
Part 2) Planning your content
So, you’ve acquired the proper equipment and built a podcasting studio (or at least cleaned out your car). Now comes the big question—what are you going to podcast about?
Take the time to plan out your content a month or more in advance. Depending on your goals, there are different ways to plan out a content calendar that will keep your audience engaged. If your goal is to build followership, try some good ol’ marketing research to learn what your target is searching for online. In our upcoming ebook, I’ll elaborate on this and provide an Excel content calendar template that will give you some ideas about how to develop a really good calendar that covers all of the most-searched keywords.
For the purpose of this post, however, the best starting point is to think about your client’s customer journey with your agency. Think about the frequently asked questions you get from your clients throughout their lifecycle. What are the things you feel like you’re always trying to explain to your buyers and sellers? Write a list, prioritize, and start working on the content.
Here’s a great tip from one of our readers, Darryl Baskin, on how to come up with topics:
“I just check my spam folder for all the lender newsletters, lead generation seminars, home improvement newsletters, insurance agents, government announcements, etc. I’ll bet you have received enough email in the past month to produce a year’s worth of shows.”
Part 3) Recording your content
This is the easy part. Put the camera/smartphone on a tripod, mic yourself up, and turn on your chatterbox! Here are a few tips to ensure your recording goes without a hitch.
- Always do a short test run. Nothing’s worse than talking in front of the camera for 20-45 minutes only to realize you didn’t actually press the record button! A test run is also important for making sure the set, lighting, and audio are recording properly.
- Make sure you’re completely free of potential distractions. Lock the kids and pets up somewhere, and turn off your cell phone. Tell others around you to give you some privacy. Put a sign on your door if you’re recording in an office where someone could potentially barge in during your production.
- Don’t ramble! Keep notes around you that highlight your talking points. Just speak as if you’re talking to your mother, and don’t worry too much about sticking to a detailed script. If reading makes better sense for you, invest in a teleprompter so that you’re not looking away from the camera.
- Speak clearly and be mindful of those filler words. Avoid “like,” “um,” “uh,” “you know,” etc. But don’t be too hard on yourself. Practice makes perfect!
Part 4) Publishing your content
Okay, so this is the trickiest part, but it only requires setting up once, so keep that in mind. There are many ways to get your audio published to your podcast channels. The following is my preferred way, mostly because I love using a regular old WordPress blog as an RSS platform. With that approach, here are three steps to getting your content published:
1) Get a WordPress blog started. Go to WordPress.com, and if you don’t already have a WordPress blog, it will start walking you through the setup right away. If you already use WordPress, go straight to step 2!
2) Install, activate, and set up a WordPress plugin called Blubrry PowerPress. Within your WordPress admin panel, Blubrry will provide clear instructions for getting started. Once you’ve gotten through the setup, Blubrry then creates a “podcast feed URL.” This is essentially your RSS feed address, which you’ll submit to your favorite podcast players like iTunes and Stitcher. (Note: You’ll need to have your first episode recorded and published before you can get the feed address. See below for instructions on how to publish an episode.) . If you’re not sure how to install a plugin, it’s super easy, but will be explained in fine detail in the upcoming ebook!
3) Submit your podcast RSS feed address to iTunes, Stitcher, and others. For iTunes, go here: iTunes Connect. Once logged in (you may need to create an Apple ID if you don’t have one already), click on the + sign, indicating that you’d like to add a new podcast to iTunes. They’ll ask you to enter your RSS feed, and in 24 hours, you should be all set.
For Stitcher, just go to stitcher.com, click on ‘Sign Up’, then scroll to the very bottom of the page and click on ‘Partner Signup’. Once there, you’ll go through a similar process as iTunes.
And you’re done setting up! As long as you’re patient in the above steps and don’t rush yourself, you’ll find that it’s really not all that hard.
4) Publish! So, you’ve got some killer content recorded, and your iTunes and Stitcher accounts have been approved. Now it’s time to go into your WordPress site, create a post, attach your media file, and publish! Here are some things to keep in mind as you make this final step:
- Before posting, go into the Media pane in your WordPress admin panel and “add media.” Once added, you’ll see your file appear in the media list. Just click on that and look for the “Media URL.” Now’s a great time to copy that address. You’ll need it later.
- Now, go to Posts and select “add new.” The first thing I like to do is get that media URL added to the Blubrry field, just below the post that you’ll be writing. Just paste it in, and go back up and write your title and description. It feels like you’re writing a blog, and you kind of are, but really, you’re writing your podcast episode description. If you are using your existing blog and don’t want this to show up among your usual blog feed, then I’d suggest either marking visibility for this post as “private” or creating a whole new WP blog dedicated to your podcast.
- Finally, publish! And just like that, your podcast will be fed into your podcast players. Give it a good 2-24 hours before you’ll see it ready for the world to listen to!
Now What?
NOW you take your podcast or video links and shout them from the rooftops! Integrate these valuable assets into your existing workflows as they fit, and keep the links in your back pocket, ready to text over to your prospects and clients at the most perfect time. Imagine your clients listening to the very important content that you just can’t get them to read in an email, while riding their peleton bike or jogging around the park. Suddenly, your messages get reached and consumed!
Mean while, cut highlight segments and feed them through your social media channels and your YouTube playlists.
So there you have it. If you’ve made it this far, congrats, you’re now on the path to building up an incredible podcast library for your clients and prospects! Still feeling a bit lost? You won’t after reading our upcoming eBook! Sign up here.
Questions? Comment below!


